Connecting Thematic MCP using OAuth client registration
This page details connection instructions for common clients that require creating a bearer token, also known as 'header based authentication'.
There are three ways of connecting MCP servers:
- OAuth using dynamic client registration. This is the simplest and most modern. Claude, ChatGPT and Cursor all use this
- OAuth using explicit client registation. Gemini Enterprise requires this
- Bearer tokens. Needed for when you can't auth in a browser and only have terminal access.
The region to server url table is reproduced here for convenience. It is vital you use the correct region when setting up the connection to ensure you can find your organization and data after connecting.
|
Region |
MCP Server URL |
|---|---|
| US | https://mcp.client.getthematic.com |
| ANZ | https://mcp.client.anz.getthematic.com |
| EU | https://mcp.client.eu.getthematic.com |
Client specific instructions
Gemini Enterprise
Gemini Enterprise supports remote MCP servers via the Custom MCP Server data store (currently in preview).
Unlike Claude.ai or ChatGPT, this is an admin-only setup — end users cannot connect MCP servers themselves. These steps apply to Gemini Enterprise Standard, Plus, and Frontline editions. MCP is not available in the Business edition, nor in Gemini features bundled into Google Workspace.
Preview limitation: VPC Service Controls are not supported while Custom MCP Server data stores are in preview.
Step 1: Override the organization policy
By default, Google Cloud blocks creation of Custom MCP Server data stores. An admin with the Organization Policy Administrator role (roles/orgpolicy.policyAdmin ) must override this:
- In the Google Cloud console, go to IAM & Admin > Organization Policies
- Select your project
- Filter for
Disable custom mcp server connector for gemini enterprise - Click the policy, then Manage Policy
- Select Override parent's policy, add a rule, set enforcement to Off, and click Set Policy
Step 2: Create a client in Thematic MCP
Navigate to the Thematic MCP Client management page here and login using your Thematic credentials.
Create a new client, for the Redirect URI you must use:
https://vertexaisearch.cloud.google.com/oauth-redirect

Make sure to copy the Client ID and Client Secret on the next page. The secret will not be able to be retrieved later.
Step 3: Create the data store
Requires the Discovery Engine Editor role (roles/discoveryengine.editor ).
- In the Google Cloud console, go to Gemini Enterprise > Data stores > Create data store
- Search for
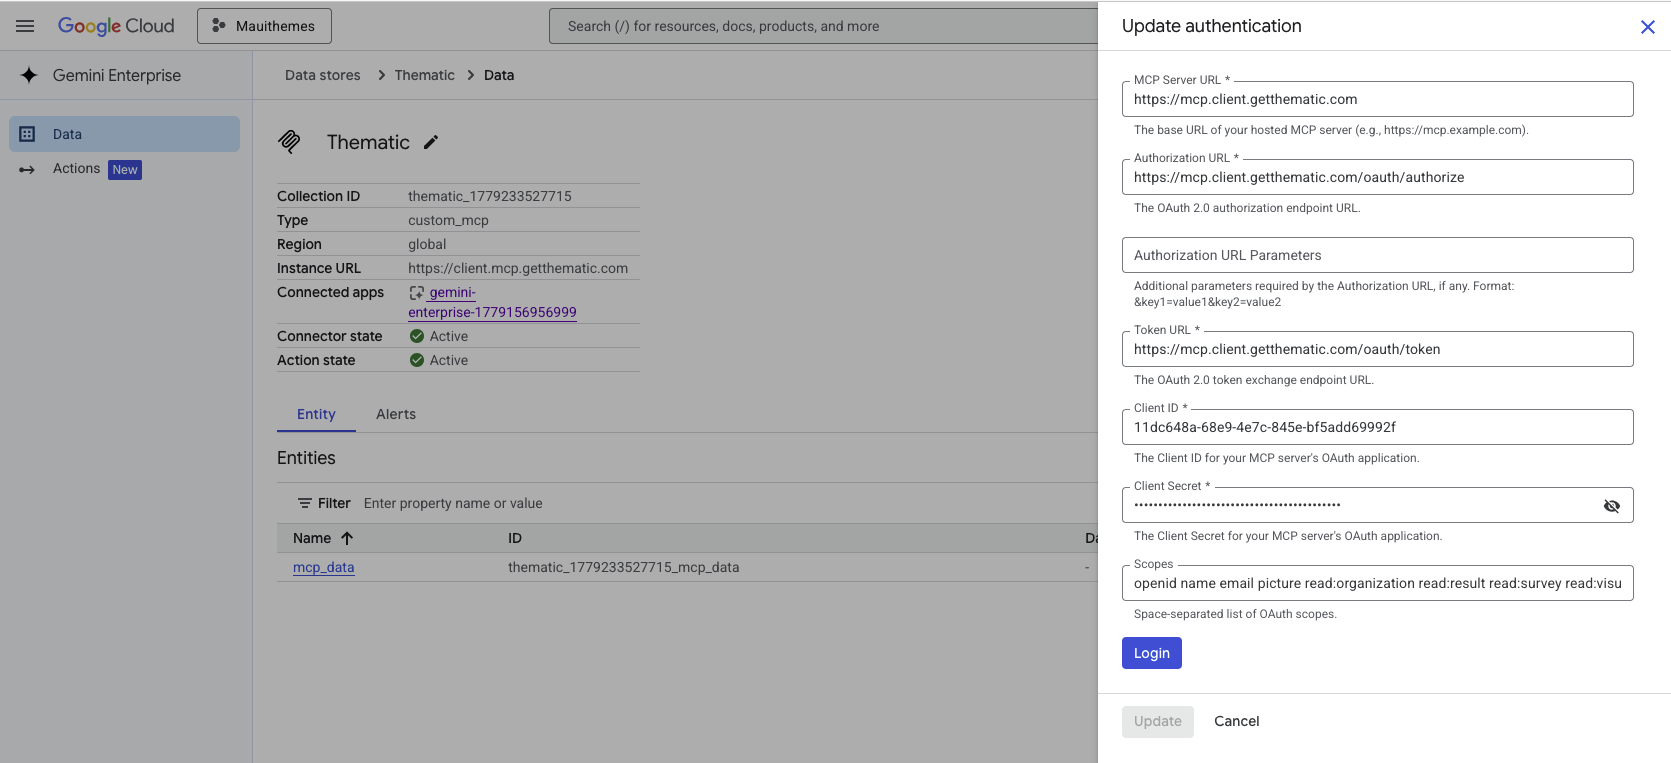
Custom MCP Serverand click the Custom MCP Server (Preview) card, then Add MCP server - In Authentication settings
- MCP Server URL Enter the Thematic MCP server URL from the table at the top of this article (for example,
https://mcp.client.getthematic.comfor US) - Authorization URL Enter the Thematic MCP server URL from the table at the top, followed by
/oauth/authorize(for examplehttps://mcp.client.getthematic.com/oauth/authorizefor the US) - Token URL Enter the Thematic MCP server URL from the table at the top, followed by
/oauth/token(for examplehttps://mcp.client.getthematic.com/oauth/tokenfor the US) - Enter the client id and secret you created in step 2
- Enter the following for scopes:
openid name email picture offline_access read:organization read:result read:survey read:visualization read:user read:themes view:analysis read:lens manage:user -
- MCP Server URL Enter the Thematic MCP server URL from the table at the top of this article (for example,
- Click Login and authenticate with your Thematic credentials.
- Click Continue, then add an MCP Server Description to help Gemini route relevant queries to Thematic. For example: "Customer feedback analytics from Thematic. Use for questions about feedback themes, sentiment, theme trends, period-over-period comparisons, and individual comments."
- Set the Location, give the data store a Name (e.g.
Thematic), and click Create - Wait for the data store status to change to Active

Step 3: Enable Thematic tools
By default no tools are enabled.
- Open the Thematic data store
- Go to the Actions tab and click Reload custom actions to reauthenticate
- Toggle on the tools you want available to users

Step 4: Connect the data store to your Gemini Enterprise app
- From Gemini Enterprise > Apps, select your app
- Click Connected data sources > Add existing data stores
- Select your Thematic data store and click Connect

Once connected, users can authorize Thematic from the Connections panel in Gemini Enterprise and start asking questions. Each user authenticates with their own Thematic credentials.
